Saturday 26 July 2014


Garlic cream sauce can be used on everything from pizza to seafood to pasta. Whether you want to make a batch for a special dinner or gathering you are hosting, or you look forward to making it a staple in your weekly menu planning, a garlic cream sauce can be simple and delicious. It only requires a few ingredients and minimal cooking time. Make garlic cream sauce by gathering the best ingredients, combining those ingredients and then using the sauce on your favorite foods.

Method 1 of 3: Assembling Ingredients for a Garlic Cream Sauce

  1. Make Garlic Cream Sauce Step 1.jpg
    1
    Purchase some fresh garlic. A great head of garlic feels heavy for its size and is covered in thin, papery skin that does not have any soft spots.
    • Look for garlic in the produce section of your grocery store, at a farmer's market or vegetable store.
  2. Make Garlic Cream Sauce Step 2.jpg
    2
    Buy a container of heavy cream. For a garlic cream sauce that serves 4 people, you will need at least 2 cups (16 oz.) of heavy cream.
    • Look for heavy cream in your grocery store. Do not mistake heavy cream for whipping cream, and avoid using a heavy cream substitute. For the best garlic cream sauce, a regular heavy cream is necessary.
  3. Make Garlic Cream Sauce Step 3.jpg
    3
    Buy a stick of butter. Whether you buy salted or unsalted butter is a matter of your personal preference. Either sort of butter will work for garlic cream sauce.
  4. Make Garlic Cream Sauce Step 4.jpg
    4
    Keep salt and pepper handy. You will season your garlic cream sauce to taste.

Method 2 of 3: Cooking Garlic Cream Sauce

  1. Make Garlic Cream Sauce Step 5.jpg
    1
    Chop the garlic finely until you have 2 tbsp. (1/8 cup).
  2. Make Garlic Cream Sauce Step 6.jpg
    2
    Melt 1 tablespoon (1/16 cup) of butter in a small saucepan over medium heat.Add the garlic once the butter has melted.
  3. Make Garlic Cream Sauce Step 7.jpg
    3
    Saute the garlic in the butter for about a minute. You want the garlic to soften, but not become brown.
  4. Make Garlic Cream Sauce Step 8.jpg
    4
    Add 2 cups (16 oz.) of heavy cream to the saucepan. Let it cook until it begins to simmer.
    • Stir the sauce and garlic occasionally while it cooks.
      Make Garlic Cream Sauce Step 8Bullet1.jpg
  5. Make Garlic Cream Sauce Step 9.jpg
    5
    Add salt and pepper to the sauce to taste. Some people like a lot of pepper in their cream sauces, others prefer modest amounts.
  6. Make Garlic Cream Sauce Step 10.jpg
    6
    Leave the sauce to simmer for about 10 minutes. It will reduce and thicken as it heats.

Method 3 of 3: Using Garlic Cream Sauce on Food

  1. Make Garlic Cream Sauce Step 11.jpg
    1
    Try garlic cream sauce as a white pizza sauce. This makes a good alternative to red sauce, especially if you use toppings such as red onion, mushrooms, spinach and bacon.
  2. Make Garlic Cream Sauce Step 12.jpg
    2
    Use garlic cream sauce on any kind of pasta. Toss it with fettuccine, penne or use it in a lasagna.
    • Add a helping of parmesan cheese to your garlic cream sauce to make an Alfredo.
      Make Garlic Cream Sauce Step 12Bullet1.jpg
  3. Make Garlic Cream Sauce Step 13.jpg
    3
    Drizzle the garlic cream sauce over grilled steaks. This will provide a creamy and flavorful sauce for your meat.
  4. Make Garlic Cream Sauce Step 14.jpg
    4
    Cover seafood in the garlic cream sauce. Shrimp, scallops and clams are especially good with the combination of garlic and cream.
  5. Make Garlic Cream Sauce Step 15.jpg
    5
    Use the garlic cream sauce as a dipping sauce for bread, crackers or veggies.It can make a nice appetizer or a snack.

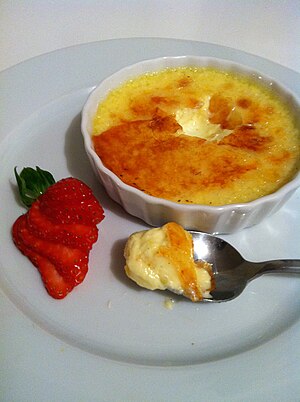
Crème Brûlée.Can hardly pronounce it but certainly can make it.

From Wikipedia, the free encyclopedia

Crème brûlée
Creme Brulee.jpeg
Alternative names
Burnt cream, crema catalana, Trinity cream
TypeDessert
Place of origin
France
Serving temperature
Room temperature
Main ingredients
Custardcaramel
 Cookbook:Crème brûlée   Crème brûlée

Crème brûlée being prepared with a small torch
Crème brûlée (/ˌkrɛm brˈl/French pronunciation: ​[kʁɛm bʁy.le]),[1]also known as burnt creamcrema catalana, or Trinity cream[2] is adessert consisting of a rich custard base topped with a contrasting layer of hard caramel. It is normally served at room temperature.
The custard base is traditionally flavored with vanilla, but can also be flavored with lemon or orange (zest), rosemarylavenderchocolate,AmarettoGrand Marniercinnamoncoffeeliqueursgreen tea,pistachiohazelnutcoconut, or other fruit.

Contents

History

The earliest known reference to crème brûlée as it is known today appears in François Massialot's 1691 cookbook,and the French name was used in the English translation of this book, but the 1731 edition of Massialot's Cuisinier roial et bourgeois changed the name of the same recipe from "crème brûlée" to "crème anglaise". In the early eighteenth century, the dessert was called "burnt cream" in English.
In Britain, a version of crème brûlée (known locally as "Trinity Cream" or "Cambridge burnt cream") was introduced at Trinity College, Cambridge, in 1879 with the college arms "impressed on top of the cream with a branding iron". The story goes that the recipe was from an Aberdeenshire country house and was offered by an undergraduate to the college cook, who turned it down. However, when the student became a Fellow, he managed to convince the cook.

Crema catalana[edit]


Crema catalana served in El Glop, Barcelona, Spain
In Catalan cuisinecrema catalana ("Catalan cream") orcrema cremada ("Burnt cream"), is a dish similar tocrème brûlée. It is traditionally served on Saint Joseph's Day (March the 19th) although nowadays it is consumed at all times of year. The custard is flavored with lemon or orange zest, and cinnamon. The sugar increma catalana is traditionally caramelized under an iron broiler or with a specially made iron, not with a flame. Sometimes Crema Catalana is baked with a pineapple on top.

Leite Creme

"Leite Creme" is a similar Portuguese dessert; the name is also used for crème caramel.

Technique


Crème brûlée flambé
Crème brûlée is usually served in individual ramekins. Discs of caramel may be prepared separately and put on top just before serving, or the caramel may be formed directly on top of the custard, immediately before serving. To do this, sugar is sprinkled onto the custard, then caramelized under a salamander broiler or with ablow torch.

Creme Brulee Recipe

This creme brulee recipe is really easy to make. Creme brulee is a simple custard, made with nothing but eggs, cream and sugar, along with a little vanilla.

To make creme brulee, you'll need some heatproof dishes called ramekins, shown in the picture here. You'll also need a creme brulee torch to caramelize the tops of the creme brulees when you're ready to serve them. You can even get a creme brulee setthat includes the torch and the ramekins.

What follows is the complete creme brulee recipe. For a step-by-step demo, see How to Make Creme Brulee.

Prep Time: 15 minutes

Cook Time: 35 minutes

Cooling and chilling time: 4 hours, 30 minutes

Total Time: 5 hours, 20 minutes

Yield: Makes 6 creme brulees.

Ingredients:

  • 8 extra-large eggs
  • 1/3 cup sugar, plus extra sugar for caramelizing
  • 1 tsp pure vanilla extract
  • 1 cup heavy cream
  • 1 cup half-and-half
So how do you make it?
Step 1: Separate the eggs


Using a whisk, beat the yolks for a minute or two, or until they're completely smooth.
Add the Sugar
How To Make Creme Brulee - Tutorial With Photos - Step 3: Add the Sugar


Now add 1/3 cup sugar and continue to whisk for about 2 more minutes, or until the the sugar is fully incorporated and the yolks are a pale shade of yellow.

Add Pure Vanilla Extract
How To Make Creme Brulee - Tutorial With Photos - Step 4: Add Pure Vanilla Extract


Add 1 teaspoon of pure vanilla extract and whisk until blended.
Add Cream
How To Make Creme Brulee - Tutorial With Photos - Step 5: Add the Cream
For this recipe we need 2 cups of cream. I like to use 1 cup of heavy cream and 1 cup of half and half. For a richer crème brûlée, use 2 cups heavy cream, or to make it a bit lighter, use 2 cups of half and half.

Add the cream and whisk until fully blended.
Strain the Custard Mixture
How To Make Creme Brulee - Tutorial With Photos - Step 6: Strain the Custard Mixture
Straining the custard filters out any eggy bits to ensure a nice, smooth consistency. Carefully pour the custard through a wire strainer (known as a sieve).

Here's a tip: rinse any egg particles out of the sieve with cold water before washing it. Hot water will cook the egg particles into the wire mesh, making it really difficult to clean.

Set up your water bath

How To Make Creme Brulee - Tutorial With Photos - Step 7: Set Up a Water Bath
Fill a large roasting pan with an inch or two of warm water, and place your empty ramekins into pan. This water bath is called a bain-marie. The water should come about halfway up the ramekins. Baking the custards in a bain-marie keeps the air in the oven moist, and prevents the crème brûlées from cracking.
Pour the Custard into the Ramekins and Bake
How To Make Creme Brulee - Tutorial With Photos - Step 8: Pour the Custard Into the Ramekins
Carefully pour the custard into the ramekins. Fill all the ramekins about halfway, then top up each one a little at a time. That way, you won't run out of custard before they're all full.

Now transfer the roasting pan into the oven. You're going to have to hold it steady so that you don't slosh water into the ramekins.

Bake for 35 minutes or until the edges are set but the centers just barely jiggle when you nudge the pan.
Cool in Water Bath
How To Make Creme Brulee - Tutorial With Photos - Step 9: Cool In Water Bath

Prepare to Caramelize 
Remove the pan from the oven and allow the custards to cool in the water bath for 30 minutes or so. Then remove the ramekins, place them on a flat sheet pan or tray, cover with plastic and chill for at least 4 hours, up to overnight.

Bring Creme Brulees to Room Temperature

Bring Creme Brulees to Room Temperature
Now that you've got the crème part down, it's time for the brûlée — which means "burnt" in French. You'll be using a butane culinary torch for that. Familiarize yourself with how your particular model works and be sure to follow the safety instructions — you're playing with real fire here!

Your completed custards have chilled for at least four hours, but overnight is best. About 20 minutes before you want to caramelize them, take them out of the refrigerator and let them sit at room temperature.

Sprinkle Creme Brulees With Granulated Sugar

If any moisture condensation has formed on the Creme Brulee tops, gently dab it away with a paper towel, being careful not to dent the custard.

Then sprinkle the tops of the Creme Brulees with granulated white sugar. Be generous — you'll pour off the excess in a moment. But make sure you cover the whole surface, and swirl the ramekins to distribute the sugar evenly.

Shake Off Excess Sugar

Shake Off Excess Sugar
Here's a tip: When you pour off the excess, pour it onto the next Creme Brulee, adding new sugar with a spoon as needed until all the Creme Brulees are covered, but there are no loose granules remaining.

Flame On!

Flame On!
Now the fun starts — it's time to fire up your torch! They all work differently, so follow the instructions for lighting yours, and adjust the length of the flame to medium.

Begin Lightly Torching the Sugar

Begin Lightly Torching the Sugar
Hold the torch a good distance away from the Creme Brulee and slowly move it closer, while sort of rotating the flame, keeping it constantly in motion. Once it gets close enough, you'll see the sugar start to liquefy and form little droplets on the surface.

Keep the Flame Moving!

Keep the Flame Moving!
As you continue cooking the sugar, you'll see little wisps of smoke puff up as the sugar begins to turn caramel-colored. You'll also smell the delicious aroma of cooked sugar, kind of like cotton candy.

Keep the flame moving so that it isn't focused on any one spot for too long. Pull the torch away if the sugar smokes excessively. Be sure to get the sugar along the edges of the ramekin as well as in the middle.

The Sugar Will Darken and Form a Glaze

The Sugar Will Darken and Form a Glaze
You'll be seeing a nice, caramel-colored glaze form on top of the Creme Brulee. It's a bit tricky knowing exactly when to stop, but it's better to stop too soon than too late. If necessary, you can always fill in any underdone spots in a minute, when the sugar cools down a bit.

The Finished Creme Brulee

The Finished Crème Brûlée
When you're finished you'll have a hard, glass-like glaze of caramelized sugar on top. Pop the Creme Brulees back into the refrigerator for 10 minutes or so before serving them, just to re-chill the Creme Brulees after they've been heated by the torch.

Serve Plain, or Garnished With Fresh Berries

Serve Creme Brulees Plain, or Garnished With Fresh Berries
You can serve the Creme Brulees just as they are, and they'll be absolutely delicious. But a few fresh berries and a dusting of powdered sugar is a nice, elegant touch.


.